Build a Coin Shop for a Tool in Roblox Studio
Use a ProximityPrompt to charge 10 in-game coins, validate the purchase on the server, and add one LightStick Tool to the player’s Backpack.
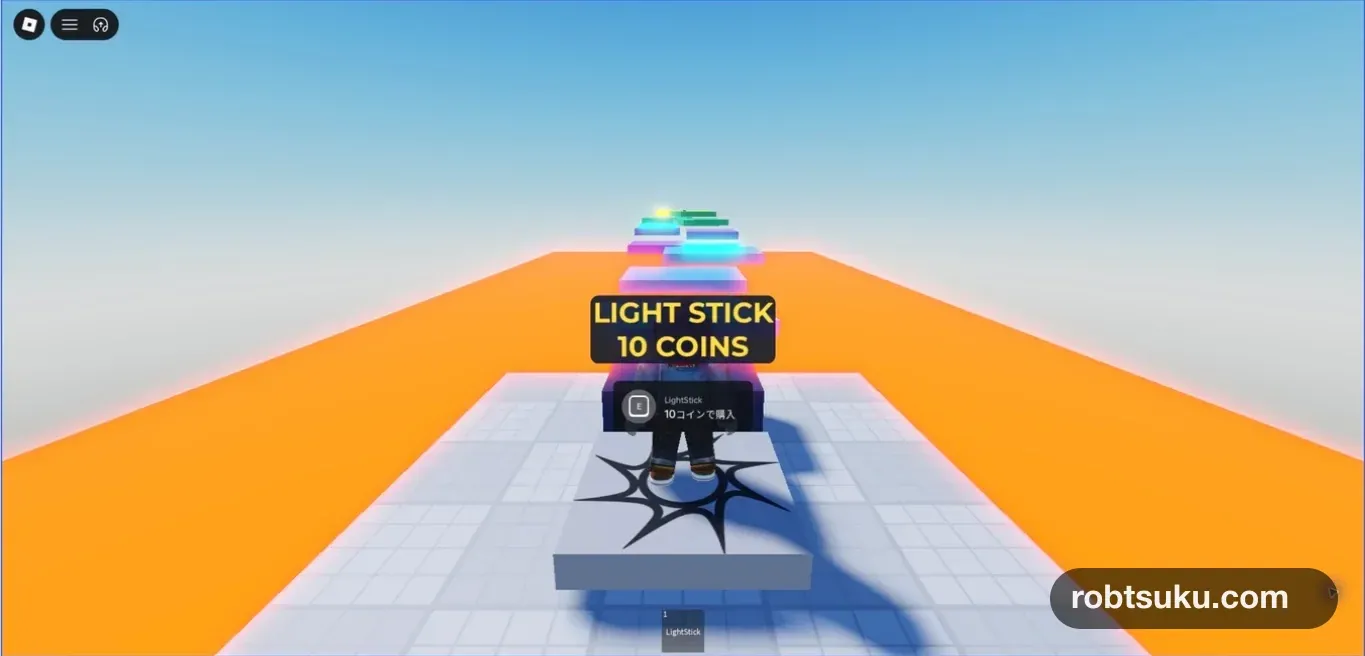
Press E near a shop to spend 10 in-game coins and receive one LightStick. A player with 9 coins gets nothing. A player who starts with 20 coins finishes with 10 and sees the Tool in the hotbar. This takes about eight minutes and does not require Robux, an external model, or publishing.
Start with a working leaderstats > Score from the collectible coins guide and StarterPack > LightStick > Handle from the Tool guide.
The server makes every purchase decision. Showing a prompt is not enough: the server checks the distance, balance, input rate, and existing inventory before it removes coins or gives the Tool.
1. Store the Tool in ServerStorage
Stop Play. In Edit mode, add a Folder under ServerStorage, rename it ShopItems, and move the parent LightStick from StarterPack into that folder.
ServerStorage
└─ ShopItems
   └─ LightStick (Tool)
      └─ Handle  (Part)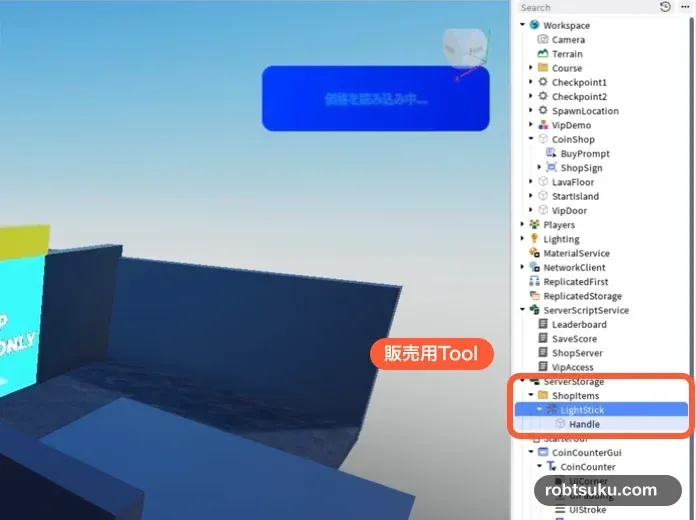
Tip — ServerStorage is a server-only storage area
Objects in
ServerStorageare not copied to players automatically. It is a suitable place for the original Tool that the shop clones after a valid purchase. IfLightStickstays inStarterPack, every player receives it for free.
Confirm that LightStick is a Tool and still contains Handle. Storing only Handle will not create a hotbar item.
If you want to sell a custom model instead, first complete the guide that turns a Blender sword into OriginalSword > Handle. The storage and purchase design stay the same; change ITEM_NAME to match the Tool.
Run one Play test before building the shop. LightStick should no longer appear in the hotbar. If it does, stop and search Explorer for LightStick; remove extra copies from StarterPack and Workspace. Keep one source copy in ServerStorage > ShopItems.
2. Create the shop and ProximityPrompt
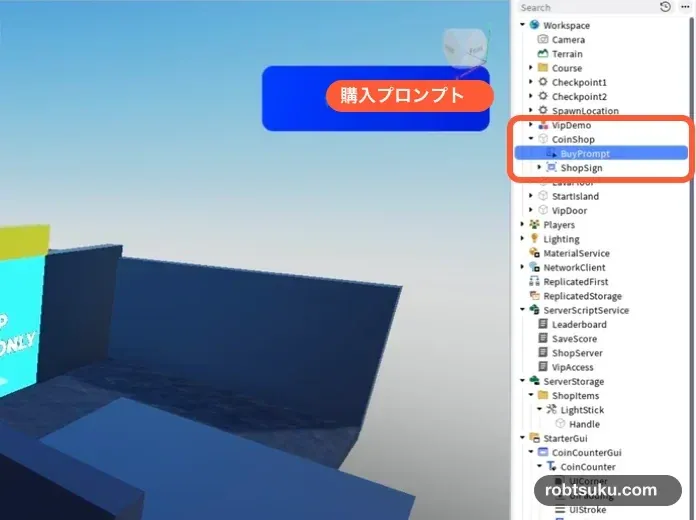
Add a Part to Workspace and rename it CoinShop. Place it where a player can walk near it, turn on Anchored, and choose any size or color. The sign shown in the screenshots is decoration and is not required by the purchase code.
Add a ProximityPrompt directly inside CoinShop and rename it BuyPrompt. Set these Properties:
| Property | Value |
|---|---|
ActionText |
Buy for 10 coins |
ObjectText |
LightStick |
KeyboardKeyCode |
E |
HoldDuration |
0 |
MaxActivationDistance |
10 |
RequiresLineOfSight |
off |
Tip — ProximityPrompt shows an action near an object
A
ProximityPromptdisplays an input such asEwhen the player is close to a Part. The same prompt becomes a tappable control on a phone. It provides the input UI; the server Script in the next section still decides whether the purchase is valid.
3. Validate the balance on the server
Add a Script to ServerScriptService, rename it ShopServer, delete its starter code, and paste this:
local Players = game:GetService("Players")
local ServerStorage = game:GetService("ServerStorage")

local COST = 10
local ITEM_NAME = "LightStick"
local MAX_DISTANCE = 12
local COOLDOWN = 0.5

local shop = workspace:WaitForChild("CoinShop")
local prompt = shop:WaitForChild("BuyPrompt")
local itemTemplate = ServerStorage
	:WaitForChild("ShopItems")
	:WaitForChild(ITEM_NAME)
local lastTriggered = {}

local function alreadyHasItem(player)
	local backpack = player:FindFirstChildOfClass("Backpack")
	local character = player.Character
	return (backpack and backpack:FindFirstChild(ITEM_NAME))
		or (character and character:FindFirstChild(ITEM_NAME))
end

local function buyItem(player)
	local now = os.clock()
	if now - (lastTriggered[player] or 0) < COOLDOWN then
		return
	end
	lastTriggered[player] = now

	local character = player.Character
	local root = character and character:FindFirstChild("HumanoidRootPart")
	if not root or (root.Position - shop.Position).Magnitude > MAX_DISTANCE then
		return
	end

	local leaderstats = player:FindFirstChild("leaderstats")
	local score = leaderstats and leaderstats:FindFirstChild("Score")
	local backpack = player:FindFirstChildOfClass("Backpack")
	if not score or not backpack or not itemTemplate:IsA("Tool") then
		return
	end

	if alreadyHasItem(player) or score.Value < COST then
		return
	end

	local item = itemTemplate:Clone()
	score.Value -= COST
	item.Parent = backpack
end

prompt.Triggered:Connect(buyItem)
Players.PlayerRemoving:Connect(function(player)
	lastTriggered[player] = nil
end)
COST is the price and itemTemplate is the source Tool. When Triggered supplies a player, the server checks the input rate, the player’s distance, Score, Backpack, and whether the same Tool is already owned. Only after every check passes does it remove 10 and put a clone into the Backpack.
MAX_DISTANCE is slightly larger than the prompt’s visible range. That allows a small movement immediately after the key press while rejecting a request from far away. COOLDOWN ignores repeated input from the same player for 0.5 seconds.
alreadyHasItem() checks both the Backpack and the character. Equipping a Tool temporarily moves it from the Backpack into the character, so checking only the Backpack would allow a second purchase while the first copy is equipped.
After the prompt fires, this path performs no network request and does not wait between the final ownership/balance check and the grant. It creates the clone, deducts the server-owned balance, and places the Tool in the Backpack as one short sequence. Keep long waits or Data Store calls outside this basic purchase path unless you also design for overlapping requests.
Roblox’s client-server security guidance recommends validating context, values, and rate on the server for client-triggered actions. The prompt never sends the price or decides the balance.
Tip — Backpack contains the player’s current Tools
Putting a Tool in
Backpackmakes it appear in the hotbar for the current Play session. This lesson does not save item ownership. Starting a new Play session correctly returns the player to the state before purchase.
4. Test with 9 coins and 20 coins
Press Play. In Explorer, select Players > your player > leaderstats > Score, then set its Value to 9 in Properties. This changes only the current Studio test; it does not use Robux or create a purchase record.
Walk near the shop. The prompt should show E, LightStick, and the action text. Press E. Score should stay at 9 and the hotbar should remain empty.
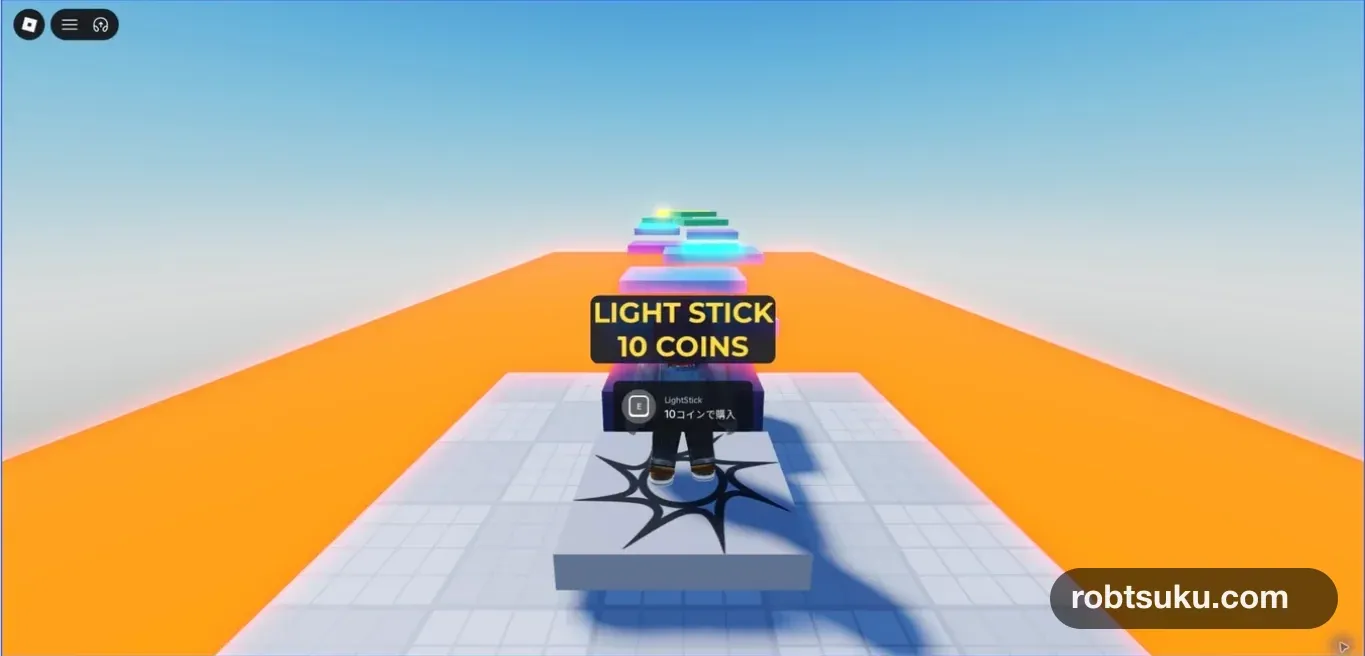
Figure guide: The shared Japanese capture says “Buy for 10 coins” beneath
LightStick. In your English version, that line is theActionTextvalue from the table; theEinput is unchanged.
Stop, start a fresh Play session, and set Score.Value to 20. Return to the shop and press E. The Score should fall to 10 and one LightStick should appear in the hotbar.
Wait at least 0.5 seconds and trigger the prompt again. The second input should not remove more coins or add another copy. Equip the Tool and repeat the check; the character search should still prevent a duplicate.
When you change the price later, update the server’s COST first and then make ActionText show the same amount. Changing only the prompt’s words does not change what the server charges.
Press Stop and start another Play session. The purchased Tool should be gone because ownership is not saved, while the source copy remains at ServerStorage > ShopItems > LightStick.
Troubleshooting
- LightStick is already in the hotbar: Move the parent Tool out of
StarterPackand intoServerStorage > ShopItems. - The prompt does not appear: Check that
BuyPromptis directly insideCoinShopandMaxActivationDistanceis10. - A balance of 20 still cannot buy it: Match the capitalization of
leaderstats,Score,CoinShop,BuyPrompt, andLightStick. - The Tool appears but cannot be held: Check
LightStick > Handleand make sureHandle.Anchoredis off. - The Tool disappears in a new session: That is expected here. Persistent ownership is outside this lesson.
Completion check
- A balance of 9 remains 9 and no Tool appears.
- A balance of 20 becomes 10 and one
LightStickappears. - Repeating the prompt does not create a second copy or a negative balance.
- The server, not the prompt or a LocalScript, controls the price and grant.
- A new Play session resets the unsaved purchase.
The server-validated shop now exchanges 10 in-game coins for one Tool. Next, show the current Score in an on-screen coin counter.
Official sources
Make a Tool You Can Hold in Roblox Studio
Turn one Part into a LightStick Tool, place it in StarterPack, and test equipping, unequipping, and equipping it again from the hotbar.
Build this feature